by Eric Meier Allowing lumber to passively sit at a given humidity level in order to obtain a desired EMC (air-drying) may be the simplest and least expensive method of seasoning wood, but it is also the very slowest. Drying times can vary significantly depending upon wood species, initial moisture level, lumber thickness, density, ambient conditions, and processing techniques.
Drying times and kilns
The traditional rule-of-thumb for air-drying lumber is to allow one year of drying time per inch of wood thickness; this adage obviously only takes a few of the aforementioned variables into account, but it’s at least a rough starting point in understanding the time investment required in order to properly air-dry lumber. In situations where green wood is to be processed into usable boards, (especially in the case of thicker lumber), a kiln is frequently used to control the drying process. While there are various types of kilns used to dry lumber, the basic premise is usually the same: a large insulated chamber or room is used to balance and control humidity, temperature, and airflow to safely and efficiently bring wood down to an acceptable moisture content. The main advantage of a kiln is that with the increased temperature and airflow—all while carefully maintaining and controlling the ambient humidity—the wood can be dried much more evenly, minimizing any sort of moisture gradient between the outer shell (which dries very quickly) and the inner core (which slowly equalizes moisture with the shell). Thus, a kiln is able to dry wood much more evenly, and it’s this uniformity in drying that allows it to also dry the wood quickly—simultaneously avoiding the drying defects usually associated with rapid, uneven drying.
Drying defects
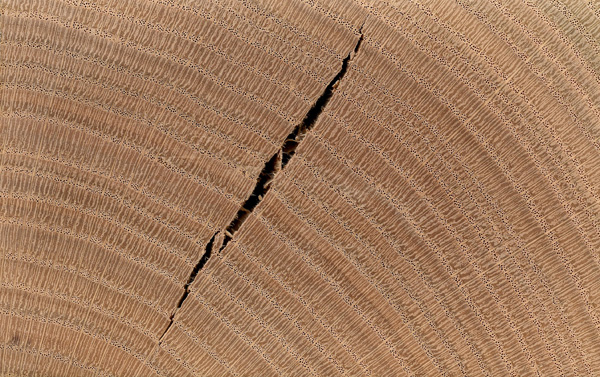
But kiln drying may also introduce internal stresses into the wood—particularly if an improper kiln schedule is used, or if corrective measures are not employed—resulting in a condition known as case-hardening. This defect is caused when the outer shell begins to dry faster than the core: the shell tries to shrink, but is inhibited by the still-wet core. If the moisture difference between the core and the shell is too great, the shell can dry in a stretched condition. Later, as the core eventually begins to dry and shrink, the condition is reversed, and the stretched shell prohibits the core from completely shrinking. In extreme instances of case-hardening, the core can split and check in an irreversible condition called honeycombing.
- Kiln drying wood at elevated temperatures also has many other secondary effects as well, such as killing powderpost beetles (a destructive wood pest) in all stages of their development. However, it can also cause some woods—such as black walnut (Juglans nigra)—to lose the vibrancy of their heartwood colors, resulting in a more uniform and/or washed-out appearance. For most woodworkers, running their own kiln to quickly dry lumber may be impractical or excessive. In most instances, simply storing project lumber at a targeted humidity level is the best option to ensure it will be at the correct EMC when building time comes. However, in some cases, such as when processing logs or other green wood into lumber, a more meticulous procedure will need to be followed.
Home air-drying tips
- Process logs in a timely fashion. If a tree has just been cut down, or there has been recent storm damage, it’s best to process the logs into lumber as quickly as possible; doing so will help to open up the wood and aid in drying, which can prevent rot or stain from marring the wood. Bark on whole logs can act as a natural moisture-barrier, and if left unsawn, can contribute to fungal decay and deterioration in some species. A hallmark of poorly processed, do-it-yourself lumber is the presence of spalted or partially rotted wood.
- Cut the wood slightly oversized. Remember that wood shrinks as it dries. This, along with the material that will inevitably be lost when the boards need to be jointed/planed smooth, mean that green wood should always be cut larger than the desired finished size. (And you usually don’t need to bother jointing/planing the wood prior to drying, since it will no doubt distort at least slightly during the drying process, and the edges should be dressed after the wood has dried to EMC—an exception to this is that two surfaces of a log should be jointed level to facilitate getting even and predictable cuts on the bandsaw.)
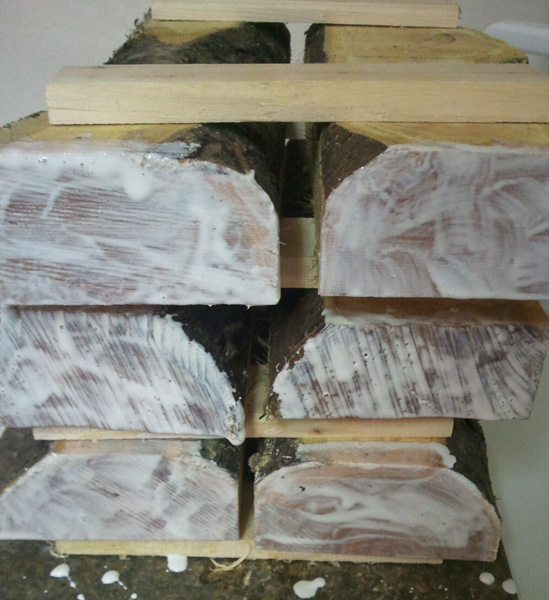
- Seal the ends. In addition to processing logs in a timely manner to prevent stain and decay due to excessive moisture, the opposite is also to be avoided: allowing the wood to dry out too quickly will result in splits and endgrain checking. It is important to remember that moisture escapes from wood about 10 to 12 times faster on the ends than through other surfaces. Sealing the endgrain forces the moisture to exit in a slower, more uniform manner. If this is neglected, the ends will tend to shrink faster than the rest of the wood, creating tremendous stresses on the piece that’s ultimately only relieved with endgrain checks—a very common drying defect. (Although there are specially formulated endgrain sealers on the market, just about anything will do in a pinch: paraffin wax, polyurethane, shellac, or even latex paint can be used to seal the endgrain surface. The key is to build up a thick, obstructing film that will inhibit moisture from escaping at the ends of the board. In order to minimize the risk of checking, it is best practice to coat lumber ends within minutes—not hours or days—after coming off the saw.
- Stack and sticker. Having lumber of uniform lengths and thicknesses greatly aids and simplifies the stacking process; once a log is sawn up into planks of satisfactory dimensions, it’s crucial to stack them in such a way that they will be exposed to air on all sides—stickers are typically used for such a task. Stickers are small pieces of wood (usually about 3/4” x 1 1/2”) that are used to add space between sawn planks, which increases ventilation and aids in a more uniform drying process. Sticker spacing varies depending on the species and thickness of the lumber being dried; a conservative spacing scheme would be every 12”, though usually 16” or 24” spacing can be safely used on thicker pieces.
- Add weight. Once the stack of wood is stacked and stickered properly, it’s helpful to add weight to the stack. The lumber at the bottom of the stack is probably weighed down sufficiently by the wood on top of it, but boards near the top greatly benefit from added weight. Weighing the stack of wood down helps to prevent warping or distortion, which is especially important during the initial drying phase when going from green to an ambient EMC. Neatly and properly stacking, stickering, and weighing wood will go a long way towards ensuring that the drying process will result in flat, stable, and usable lumber.